 are available. This 3U LED VU unit is suitable to any Studer Reel to Reel machine – or any other recorder – which comes without VU meters to enable control and monitor of recording and playback levels. Ensures calibrated and un-calibrated level control modes […]")
 are available. This 3U LED VU unit is suitable to any Studer Reel to Reel machine – or any other recorder – which comes without VU meters to enable control and monitor of recording and playback levels. Ensures calibrated and un-calibrated level control modes […]")
 are available. This 3U LED VU unit is suitable to any Studer Reel to Reel machine – or any other recorder – which comes without VU meters to enable control and monitor of recording and playback levels. Ensures calibrated and un-calibrated level control modes […]")
 are available. This 3U LED VU unit is suitable to any Studer Reel to Reel machine – or any other recorder – which comes without VU meters to enable control and monitor of recording and playback levels. Ensures calibrated and un-calibrated level control modes […]")
 are available. This 3U LED VU unit is suitable to any Studer Reel to Reel machine – or any other recorder – which comes without VU meters to enable control and monitor of recording and playback levels. Ensures calibrated and un-calibrated level control modes […]")
 are available. This 3U LED VU unit is suitable to any Studer Reel to Reel machine – or any other recorder – which comes without VU meters to enable control and monitor of recording and playback levels. Ensures calibrated and un-calibrated level control modes […]")
 are available. This 3U LED VU unit is suitable to any Studer Reel to Reel machine – or any other recorder – which comes without VU meters to enable control and monitor of recording and playback levels. Ensures calibrated and un-calibrated level control modes […]")
 are available. This 3U LED VU unit is suitable to any Studer Reel to Reel machine – or any other recorder – which comes without VU meters to enable control and monitor of recording and playback levels. Ensures calibrated and un-calibrated level control modes […]")
 are available. This 3U LED VU unit is suitable to any Studer Reel to Reel machine – or any other recorder – which comes without VU meters to enable control and monitor of recording and playback levels. Ensures calibrated and un-calibrated level control modes […]")
 are available. This 3U LED VU unit is suitable to any Studer Reel to Reel machine – or any other recorder – which comes without VU meters to enable control and monitor of recording and playback levels. Ensures calibrated and un-calibrated level control modes […]")
 are available. This 3U LED VU unit is suitable to any Studer Reel to Reel machine – or any other recorder – which comes without VU meters to enable control and monitor of recording and playback levels. Ensures calibrated and un-calibrated level control modes […]")
 are available. This 3U LED VU unit is suitable to any Studer Reel to Reel machine – or any other recorder – which comes without VU meters to enable control and monitor of recording and playback levels. Ensures calibrated and un-calibrated level control modes […]")
 are available. This 3U LED VU unit is suitable to any Studer Reel to Reel machine – or any other recorder – which comes without VU meters to enable control and monitor of recording and playback levels. Ensures calibrated and un-calibrated level control modes […]")
 are available. This 3U LED VU unit is suitable to any Studer Reel to Reel machine – or any other recorder – which comes without VU meters to enable control and monitor of recording and playback levels. Ensures calibrated and un-calibrated level control modes […]")
 are available. This 3U LED VU unit is suitable to any Studer Reel to Reel machine – or any other recorder – which comes without VU meters to enable control and monitor of recording and playback levels. Ensures calibrated and un-calibrated level control modes […]")
 are available. This 3U LED VU unit is suitable to any Studer Reel to Reel machine – or any other recorder – which comes without VU meters to enable control and monitor of recording and playback levels. Ensures calibrated and un-calibrated level control modes […]")
 are available. This 3U LED VU unit is suitable to any Studer Reel to Reel machine – or any other recorder – which comes without VU meters to enable control and monitor of recording and playback levels. Ensures calibrated and un-calibrated level control modes […]")
 are available. This 3U LED VU unit is suitable to any Studer Reel to Reel machine – or any other recorder – which comes without VU meters to enable control and monitor of recording and playback levels. Ensures calibrated and un-calibrated level control modes […]")
 are available. This 3U LED VU unit is suitable to any Studer Reel to Reel machine – or any other recorder – which comes without VU meters to enable control and monitor of recording and playback levels. Ensures calibrated and un-calibrated level control modes […]")
Description
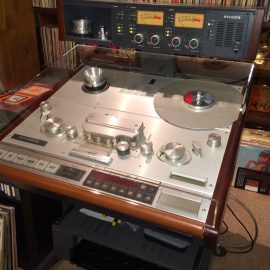
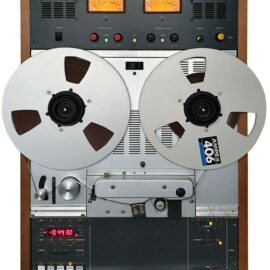
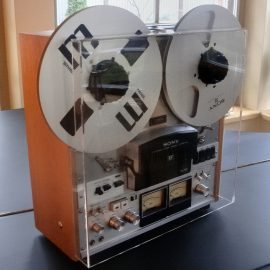
Rack Mount or Table top (Shelf version with wood side panels) are available.
This 3U LED VU unit is suitable to any Studer Reel to Reel machine – or any other recorder – which comes without VU meters to enable control and monitor of recording and playback levels. Ensures calibrated and un-calibrated level control modes of recording and playback. In principle this unit works as a studio console
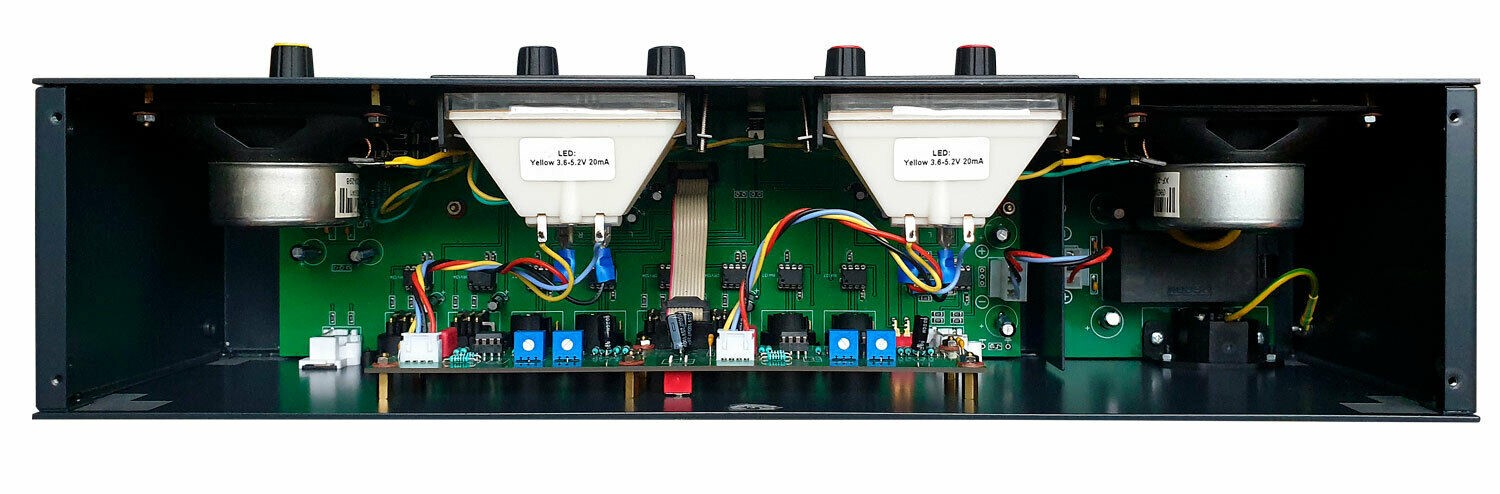
4 LED bars enable to monitor simultaneously the input and output levels.
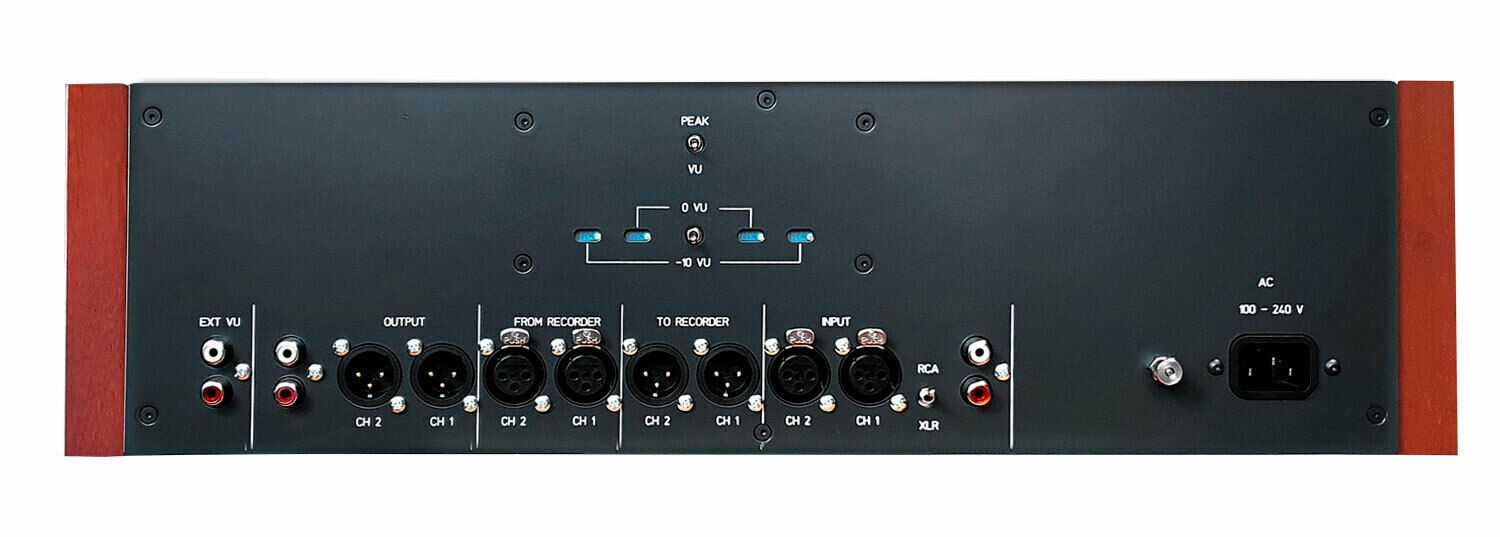
Unit’s “0” value for VU meters is calibrated to “normal” Studer (studio standard) level – +4dB. “0” level can be adjusted to other values – if you want so.
All parts are top quality, schematics used are from top manufacturers. Operational Amplifiers are exchangeable – mounted in sockets. We use Texas Instruments INA137PA, DRV134PA.
In the input and output sections are additional RCA sockets. You can connect signal source which does not have XLR sockets.
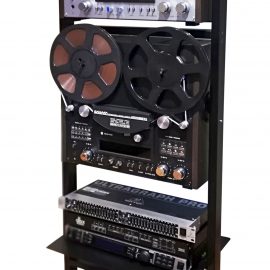
Please see our separate listing – VU https://www.ebay.com/itm/133448334603 unit in Meter Bridge configurations – full setup with a stand (trolley) – and side panels with a bracket – like original Studer – trolley/meter bridge version. Stand is very durable and solid – made from 2mm steel tubing. Adjustable from horizontal to vertical position in 15 deg increments. Factory powder coated in “Studer Grey” RAL 7016 yet can be coated in any RAL color. Three standard colors are Studer Grey RAL 7016, Black RAL 9005 and Metalic Aluminium RAL9006.
| Specifications | |
| Analogue inputs (unbalanced) | RCA pin jacks |
| Nominal input level | -10 dBV (0.316 Vrms) |
| Maximum input level | +10 dBV (3.16 Vrms) |
| Input impedance | > 50 kOhm |
| Analogue inputs (balanced) | XLR-3 (1: GND, 2: HOT, 3:COLD) |
| Nominal input level | +4 dBu (1.23 Vrms) |
| Maximum input level | +24 dBu (12.3 Vrms) |
| Differencial input impedance | 24 kOhm |
| Analogue outputs (unbalaced) | RCA pin jacks |
| Nominal output level | -2 dBu (0.615 Vrms) |
| Maximum output level | +18 dBu (6.15 Vrms) |
| Output impedance | 100 Ohm |
| Analogue outputs (balanced) | XLR-3 (1: GND, 2: HOT, 3:COLD) |
| Nominal output level | +4 dBu (1.23 vrms) |
| Maximum output level | +24 dBu (12.3 Vrms) |
| Output impedance | 200 Ohm |
| Audio performance | |
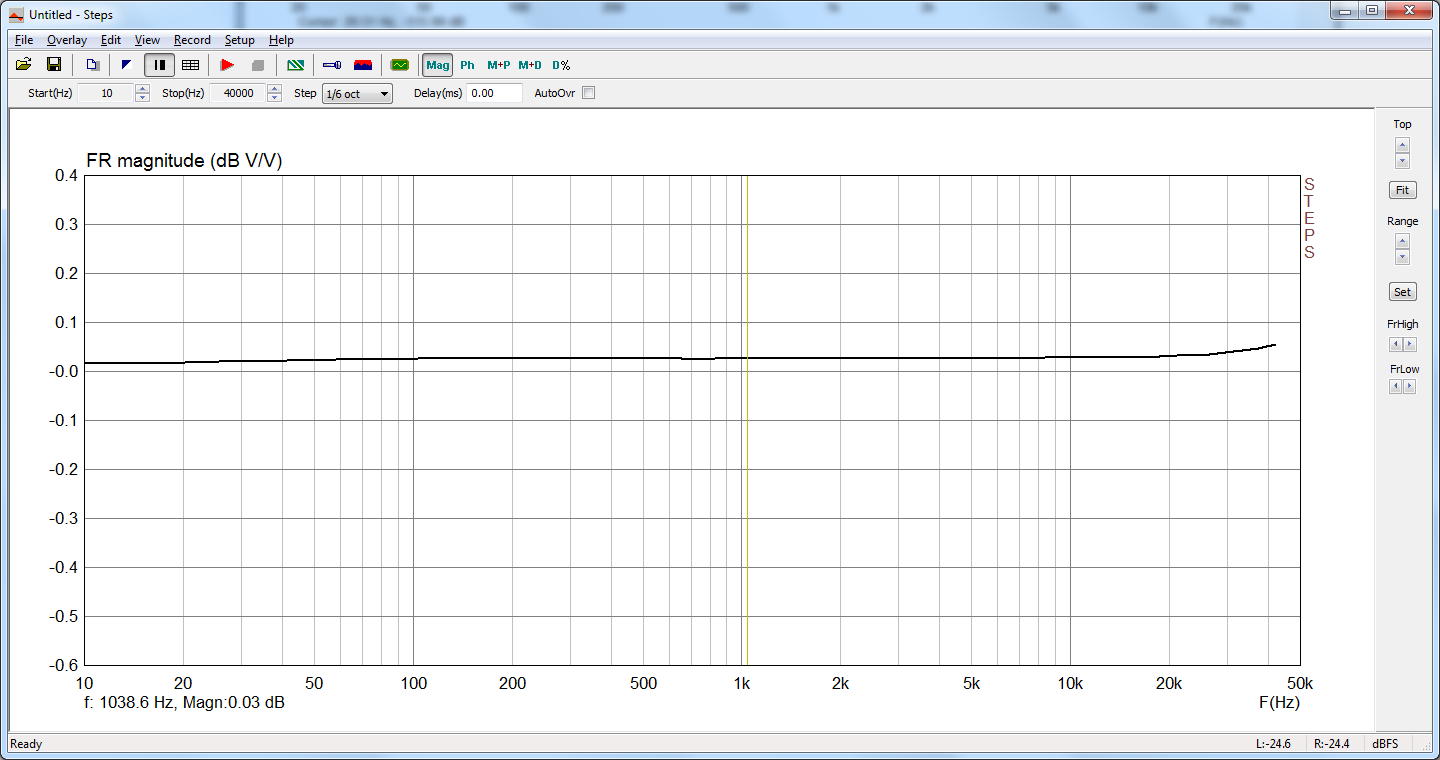
| Frequency response | 10 Hz – 50 kHz, ±0.1 dB |
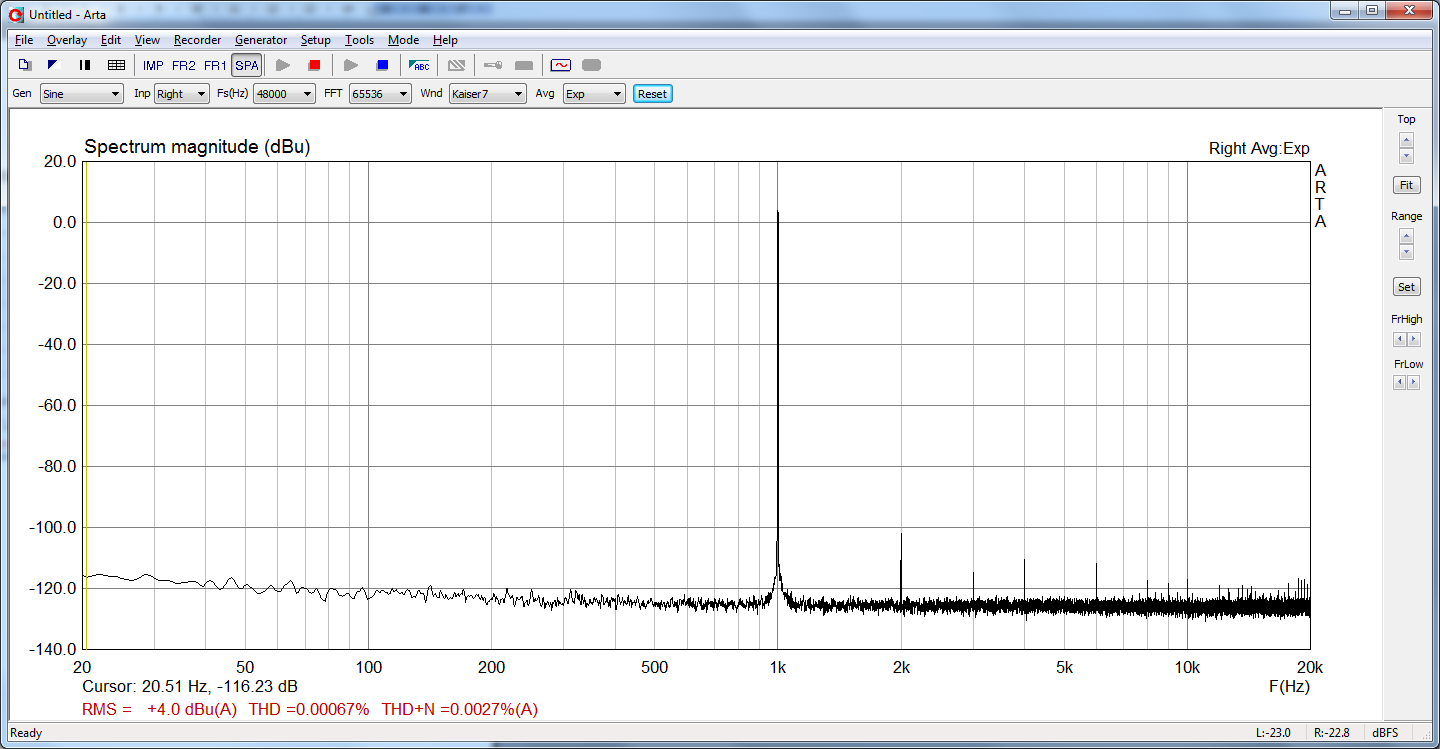
| Distortion (THD) | 0.0007 % or less |
| Distortion Plus Noise (THD + N) | 0.003 % or less |
| Power suply and other specifications | |
| Mains power | AC 100–240 V, 50-60 Hz |
| Power consumption | 10 W |
| Dimension (W x H x D) | 440 mm x 132 mm x 130 mm |
| Weight | 2.7 kg |


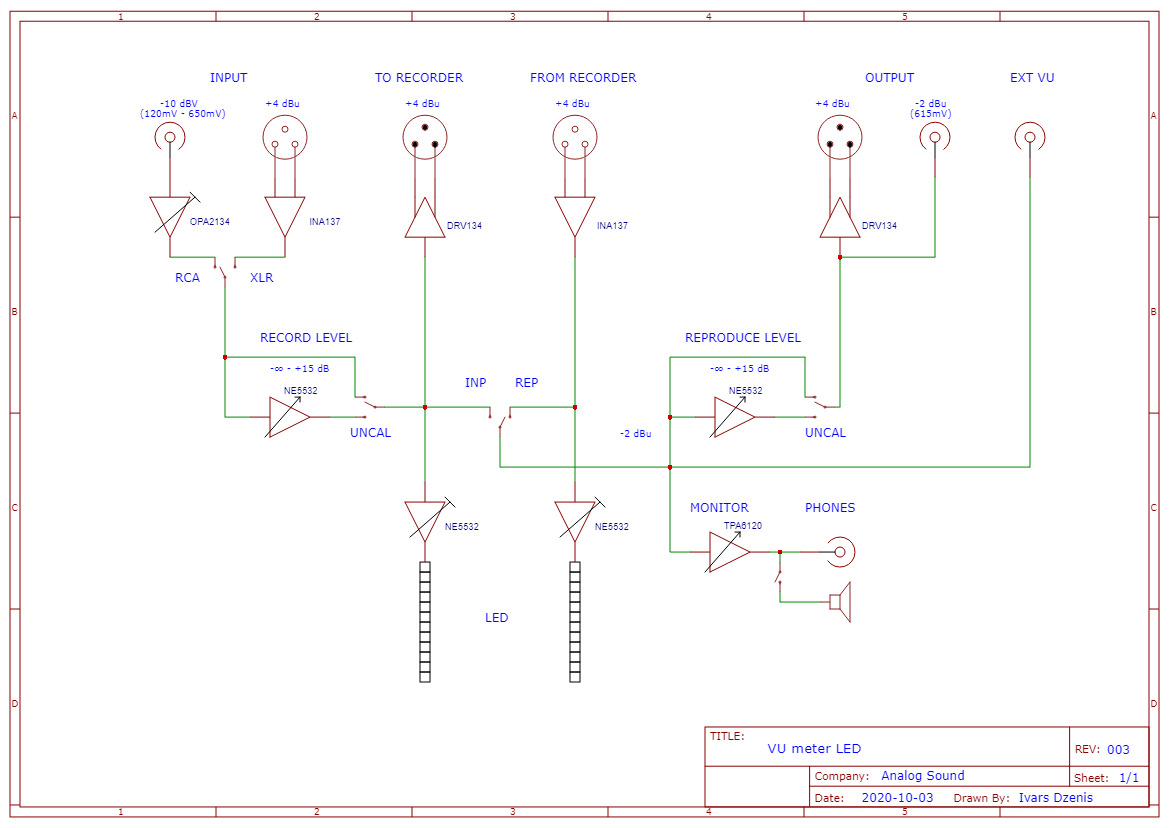
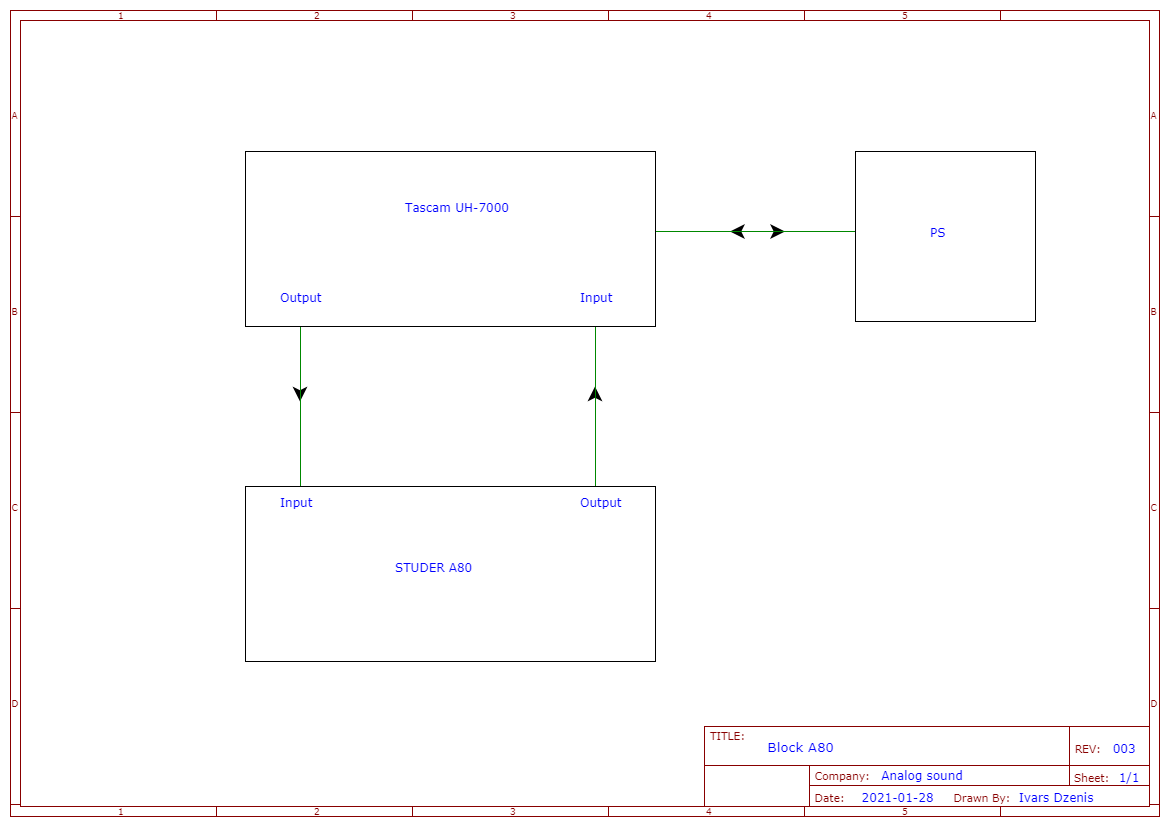
Internal block diagram
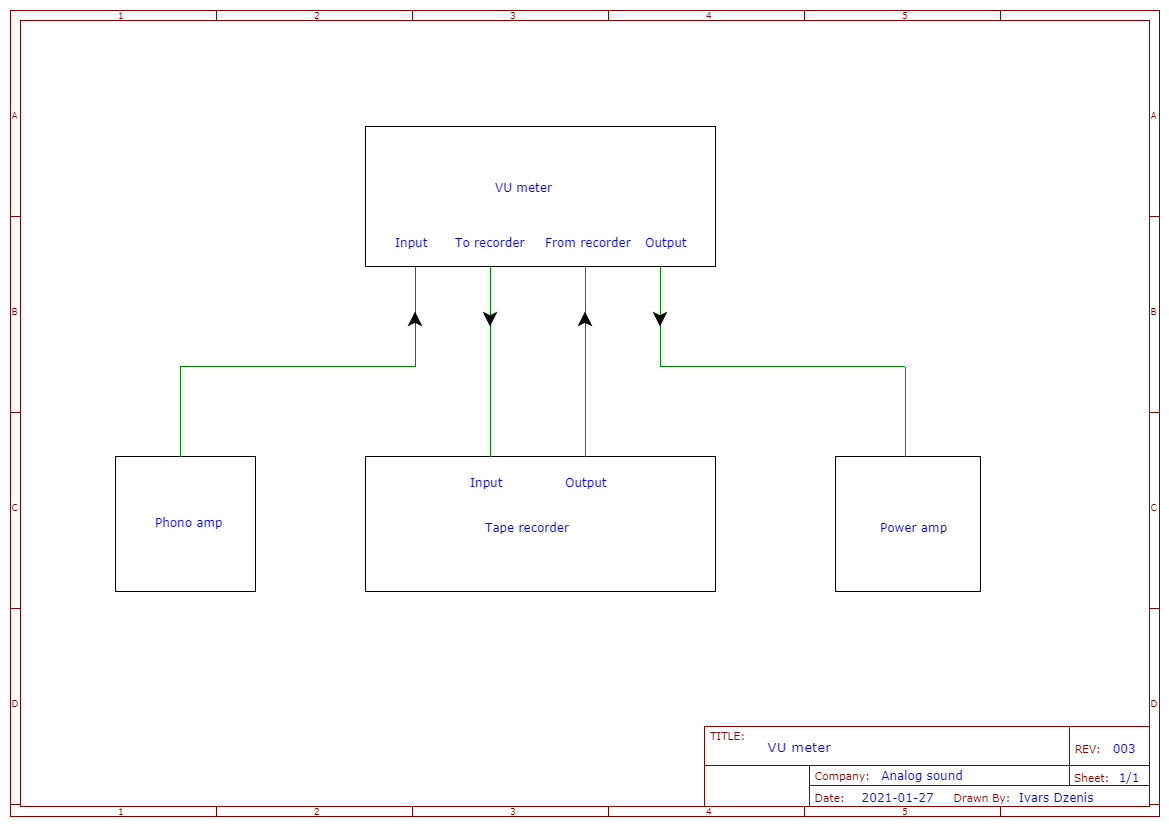
Connection example
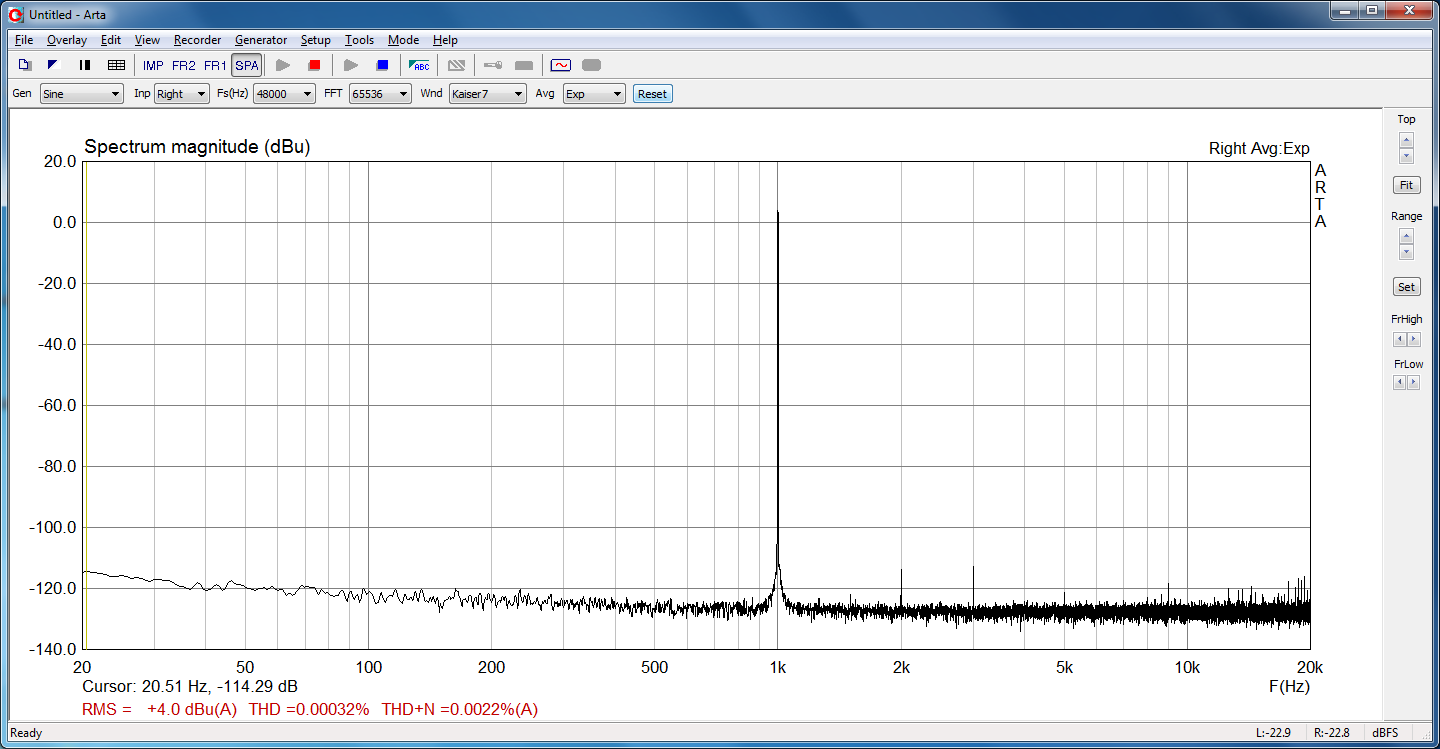
Measurements
Tascam UH-7000 LOOP
STUDER A80-R
CAL INP
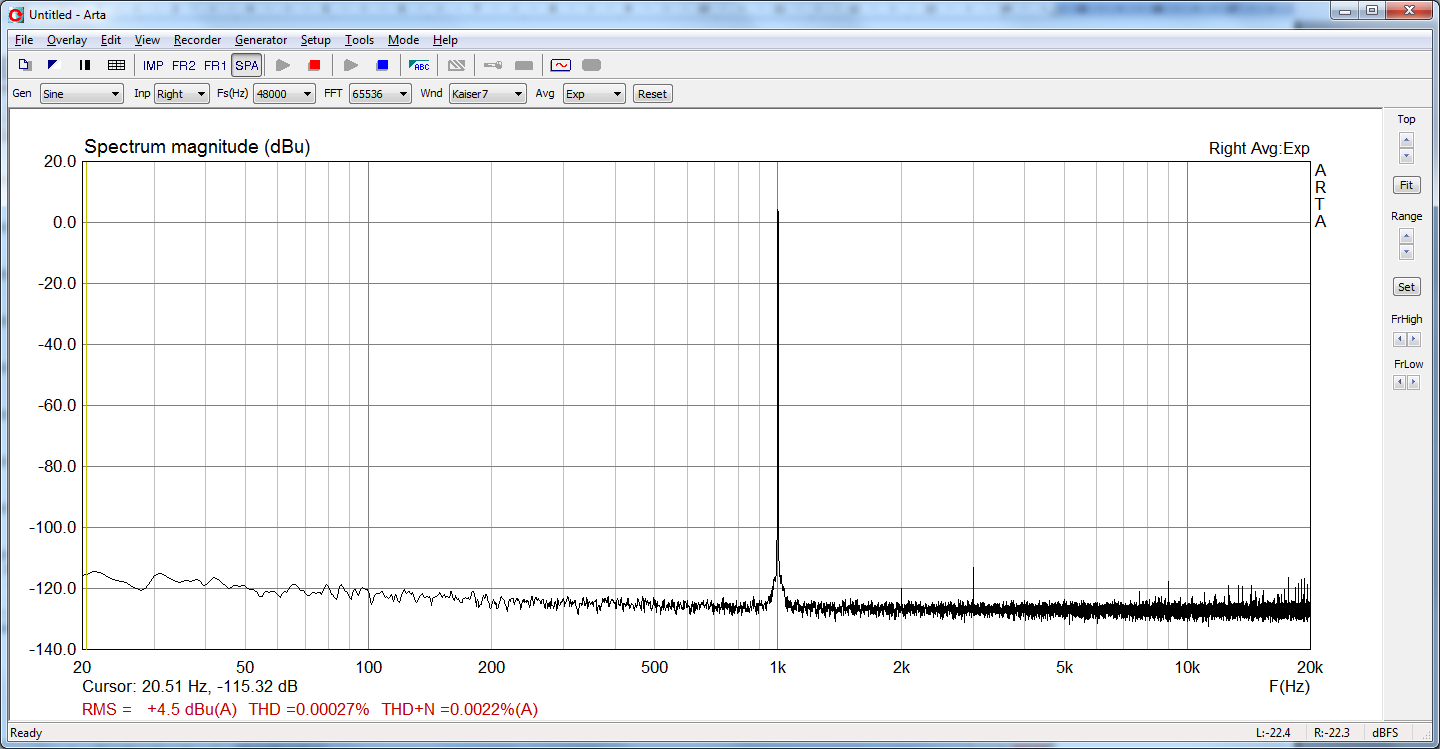
CAL REP
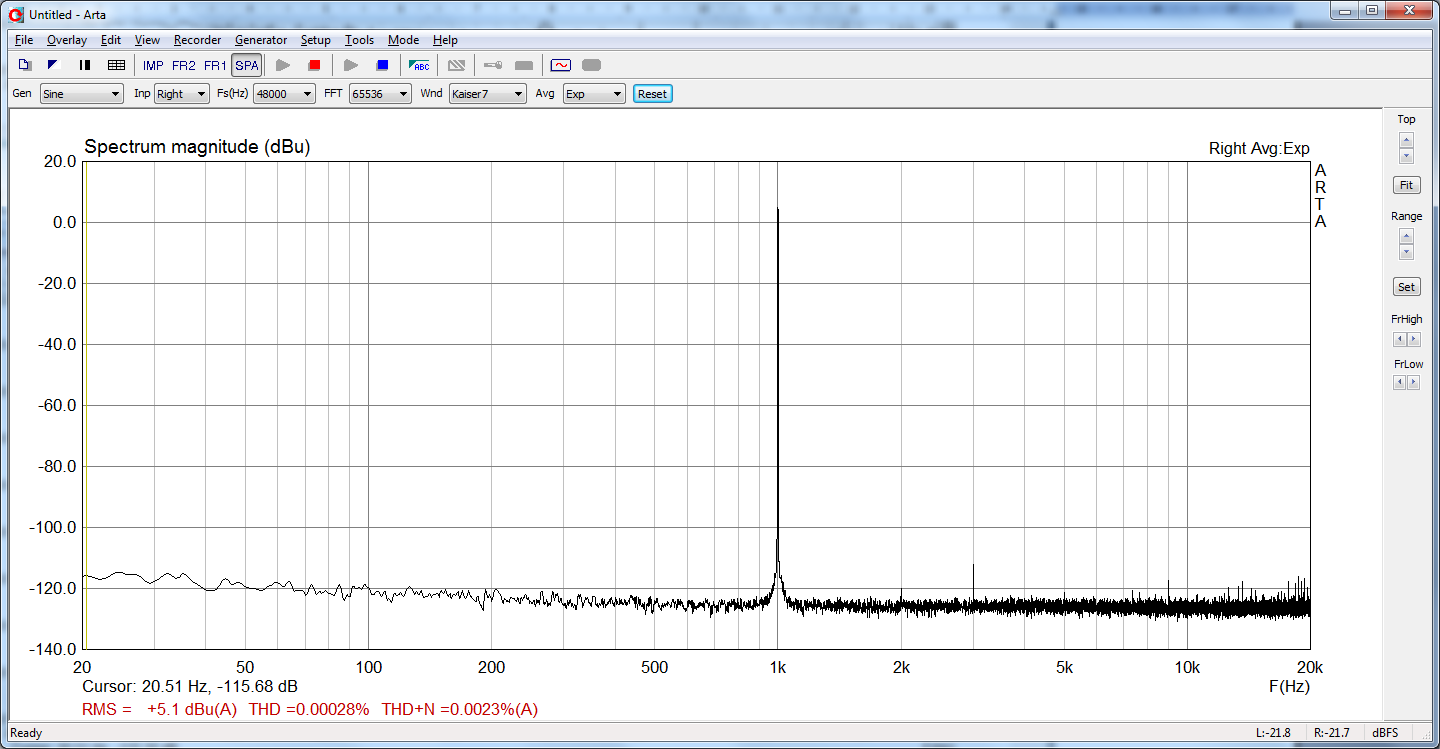
UNCAL INP
UNCAL REP

UNCAL REP
– Set the RCA / XLR switch to XLR.
– Set the Peak / VU switch to VU.
– Deactivate the RECORD LEVEL-UNCAL (Front panel) switch.
– Switch on the INP (Front panel) switch.
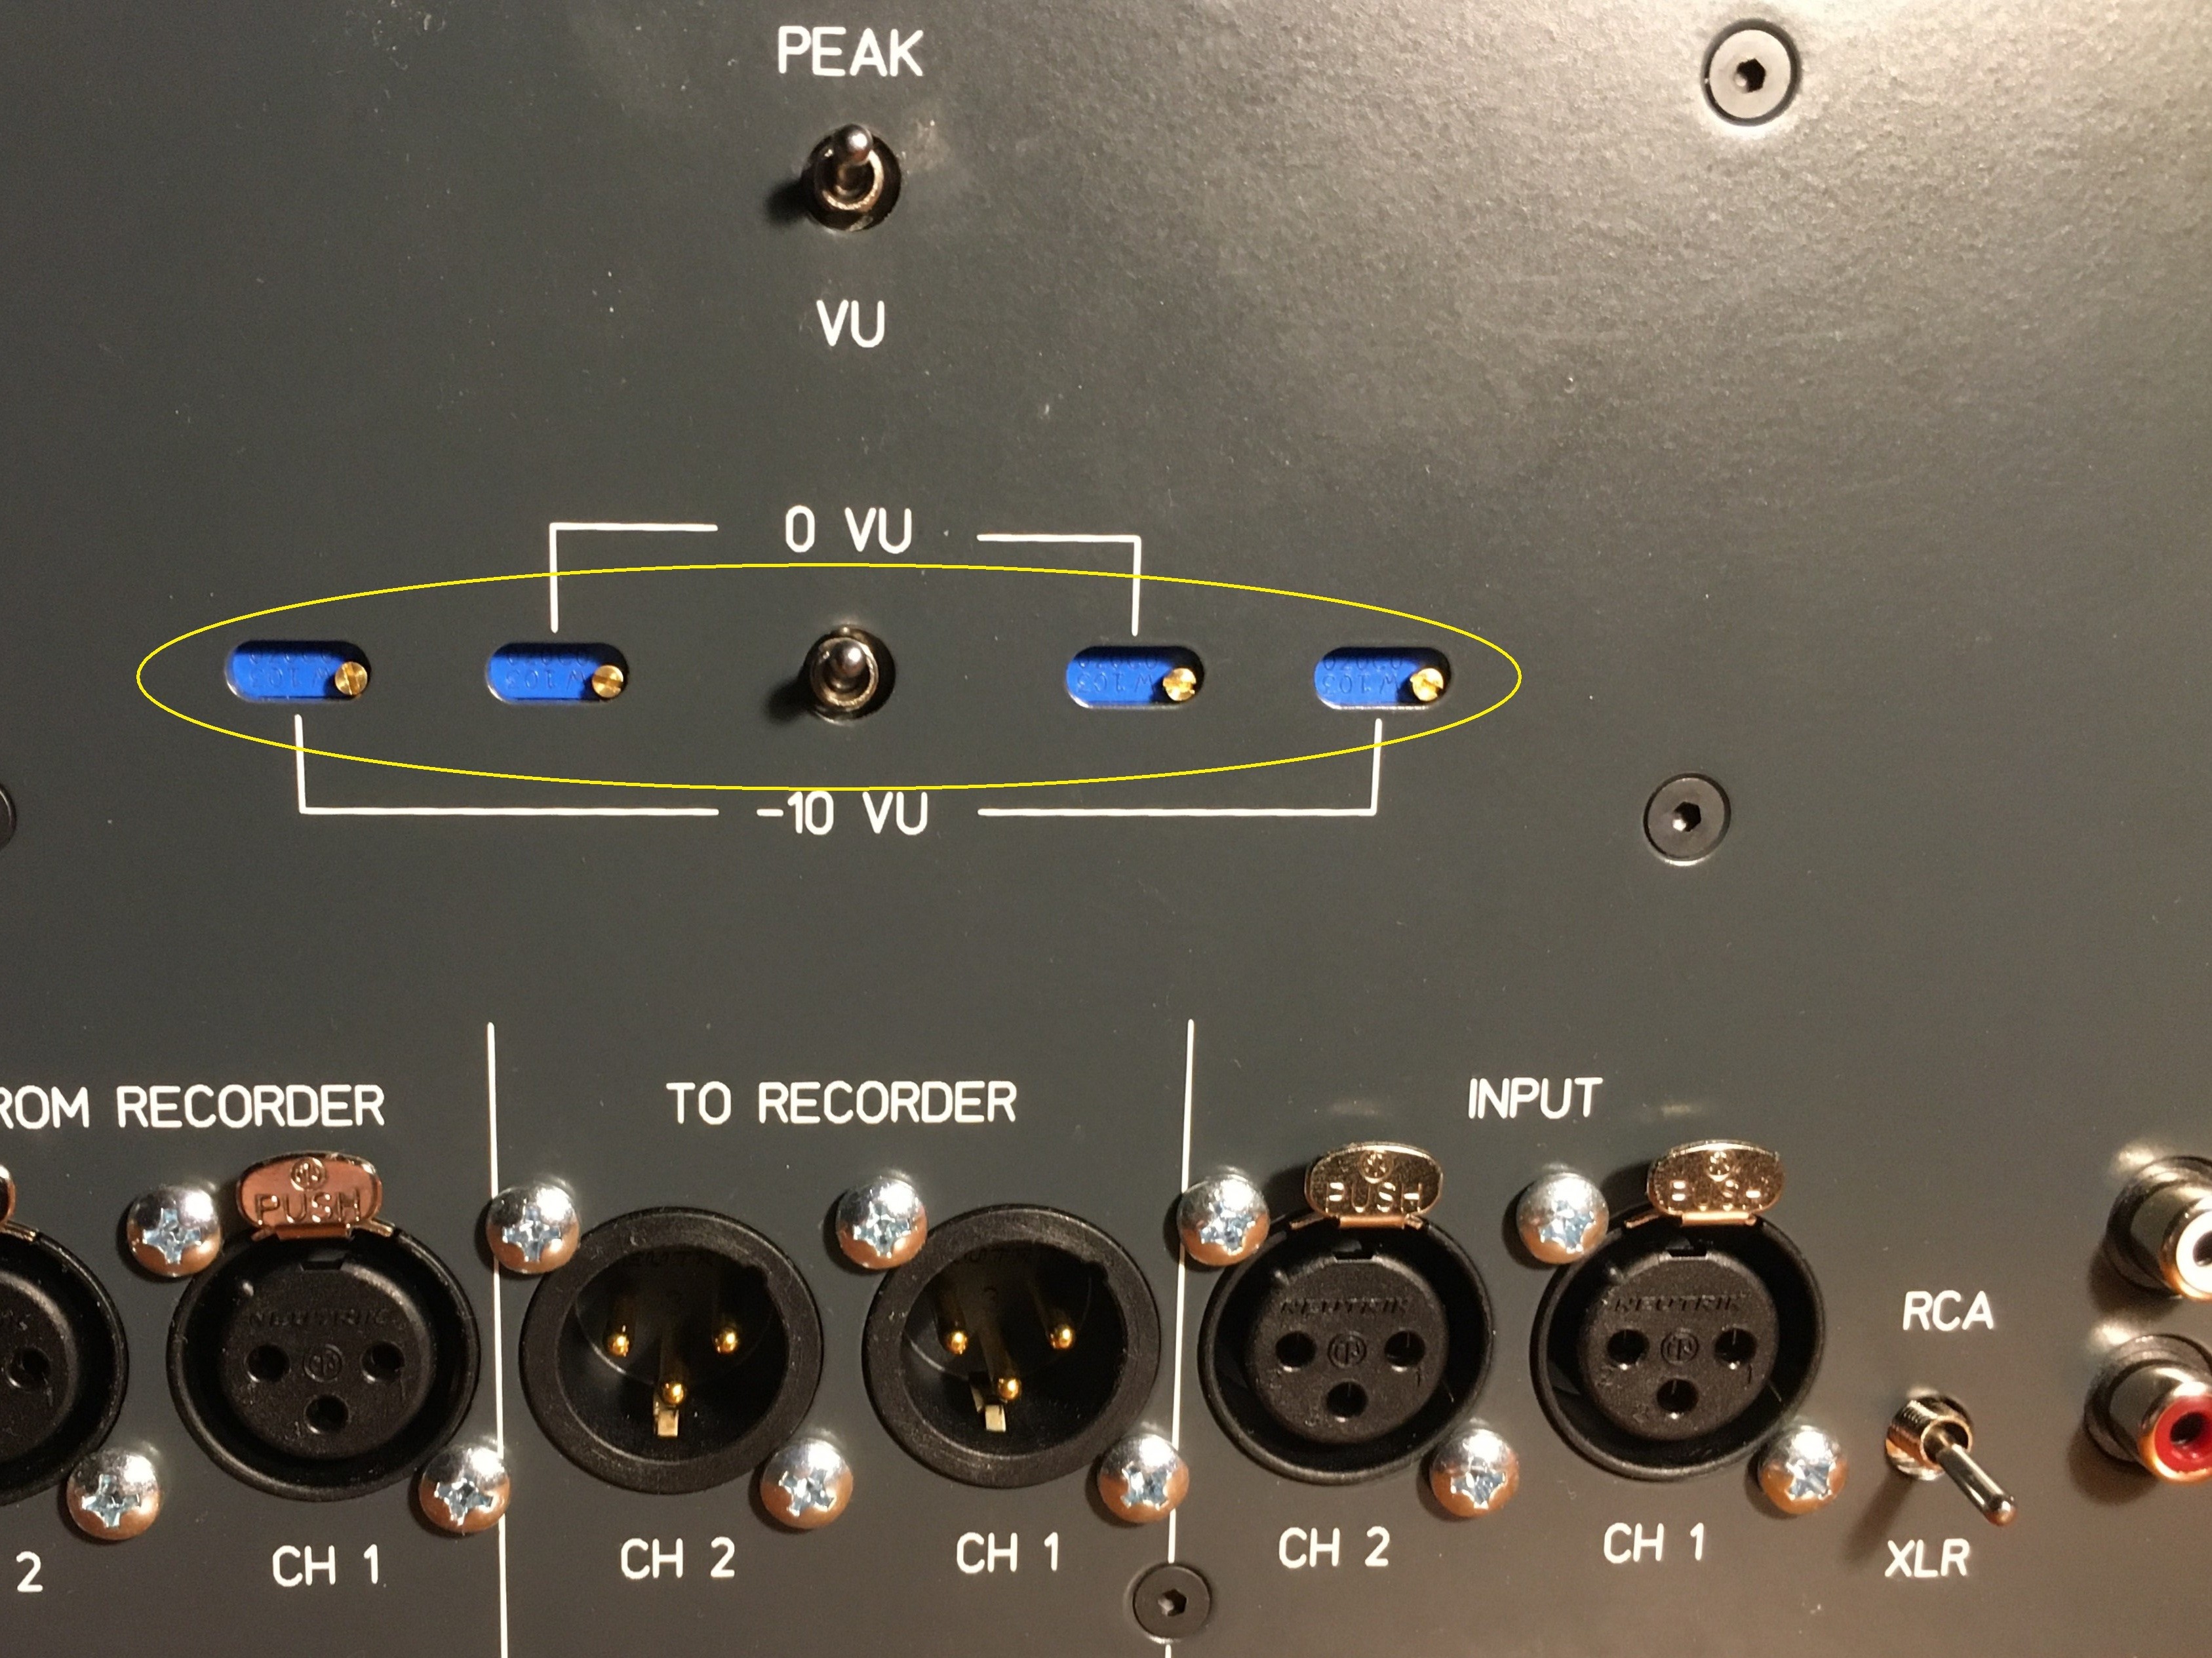
– Set switch 0 VU / -10 VU to 0 VU.
– +4 dBu (1,223 Vrms) signal at XLR input INPUT.
– Use potentiometer 0 on the back of the VU to set the VU meter reading to 0.
– Carry out the adjustment for channel CH1 and CH2.
– Set the switch to 0 VU / – 10 VU to -10 VU.
– At -6 dBu (0.388 Vrms) signal to XLR input INPUT.
– Use potentiometer -10 on the back of the VU to set the VU meter reading to 0.
– Carry out the adjustment for channel CH1 and CH2.
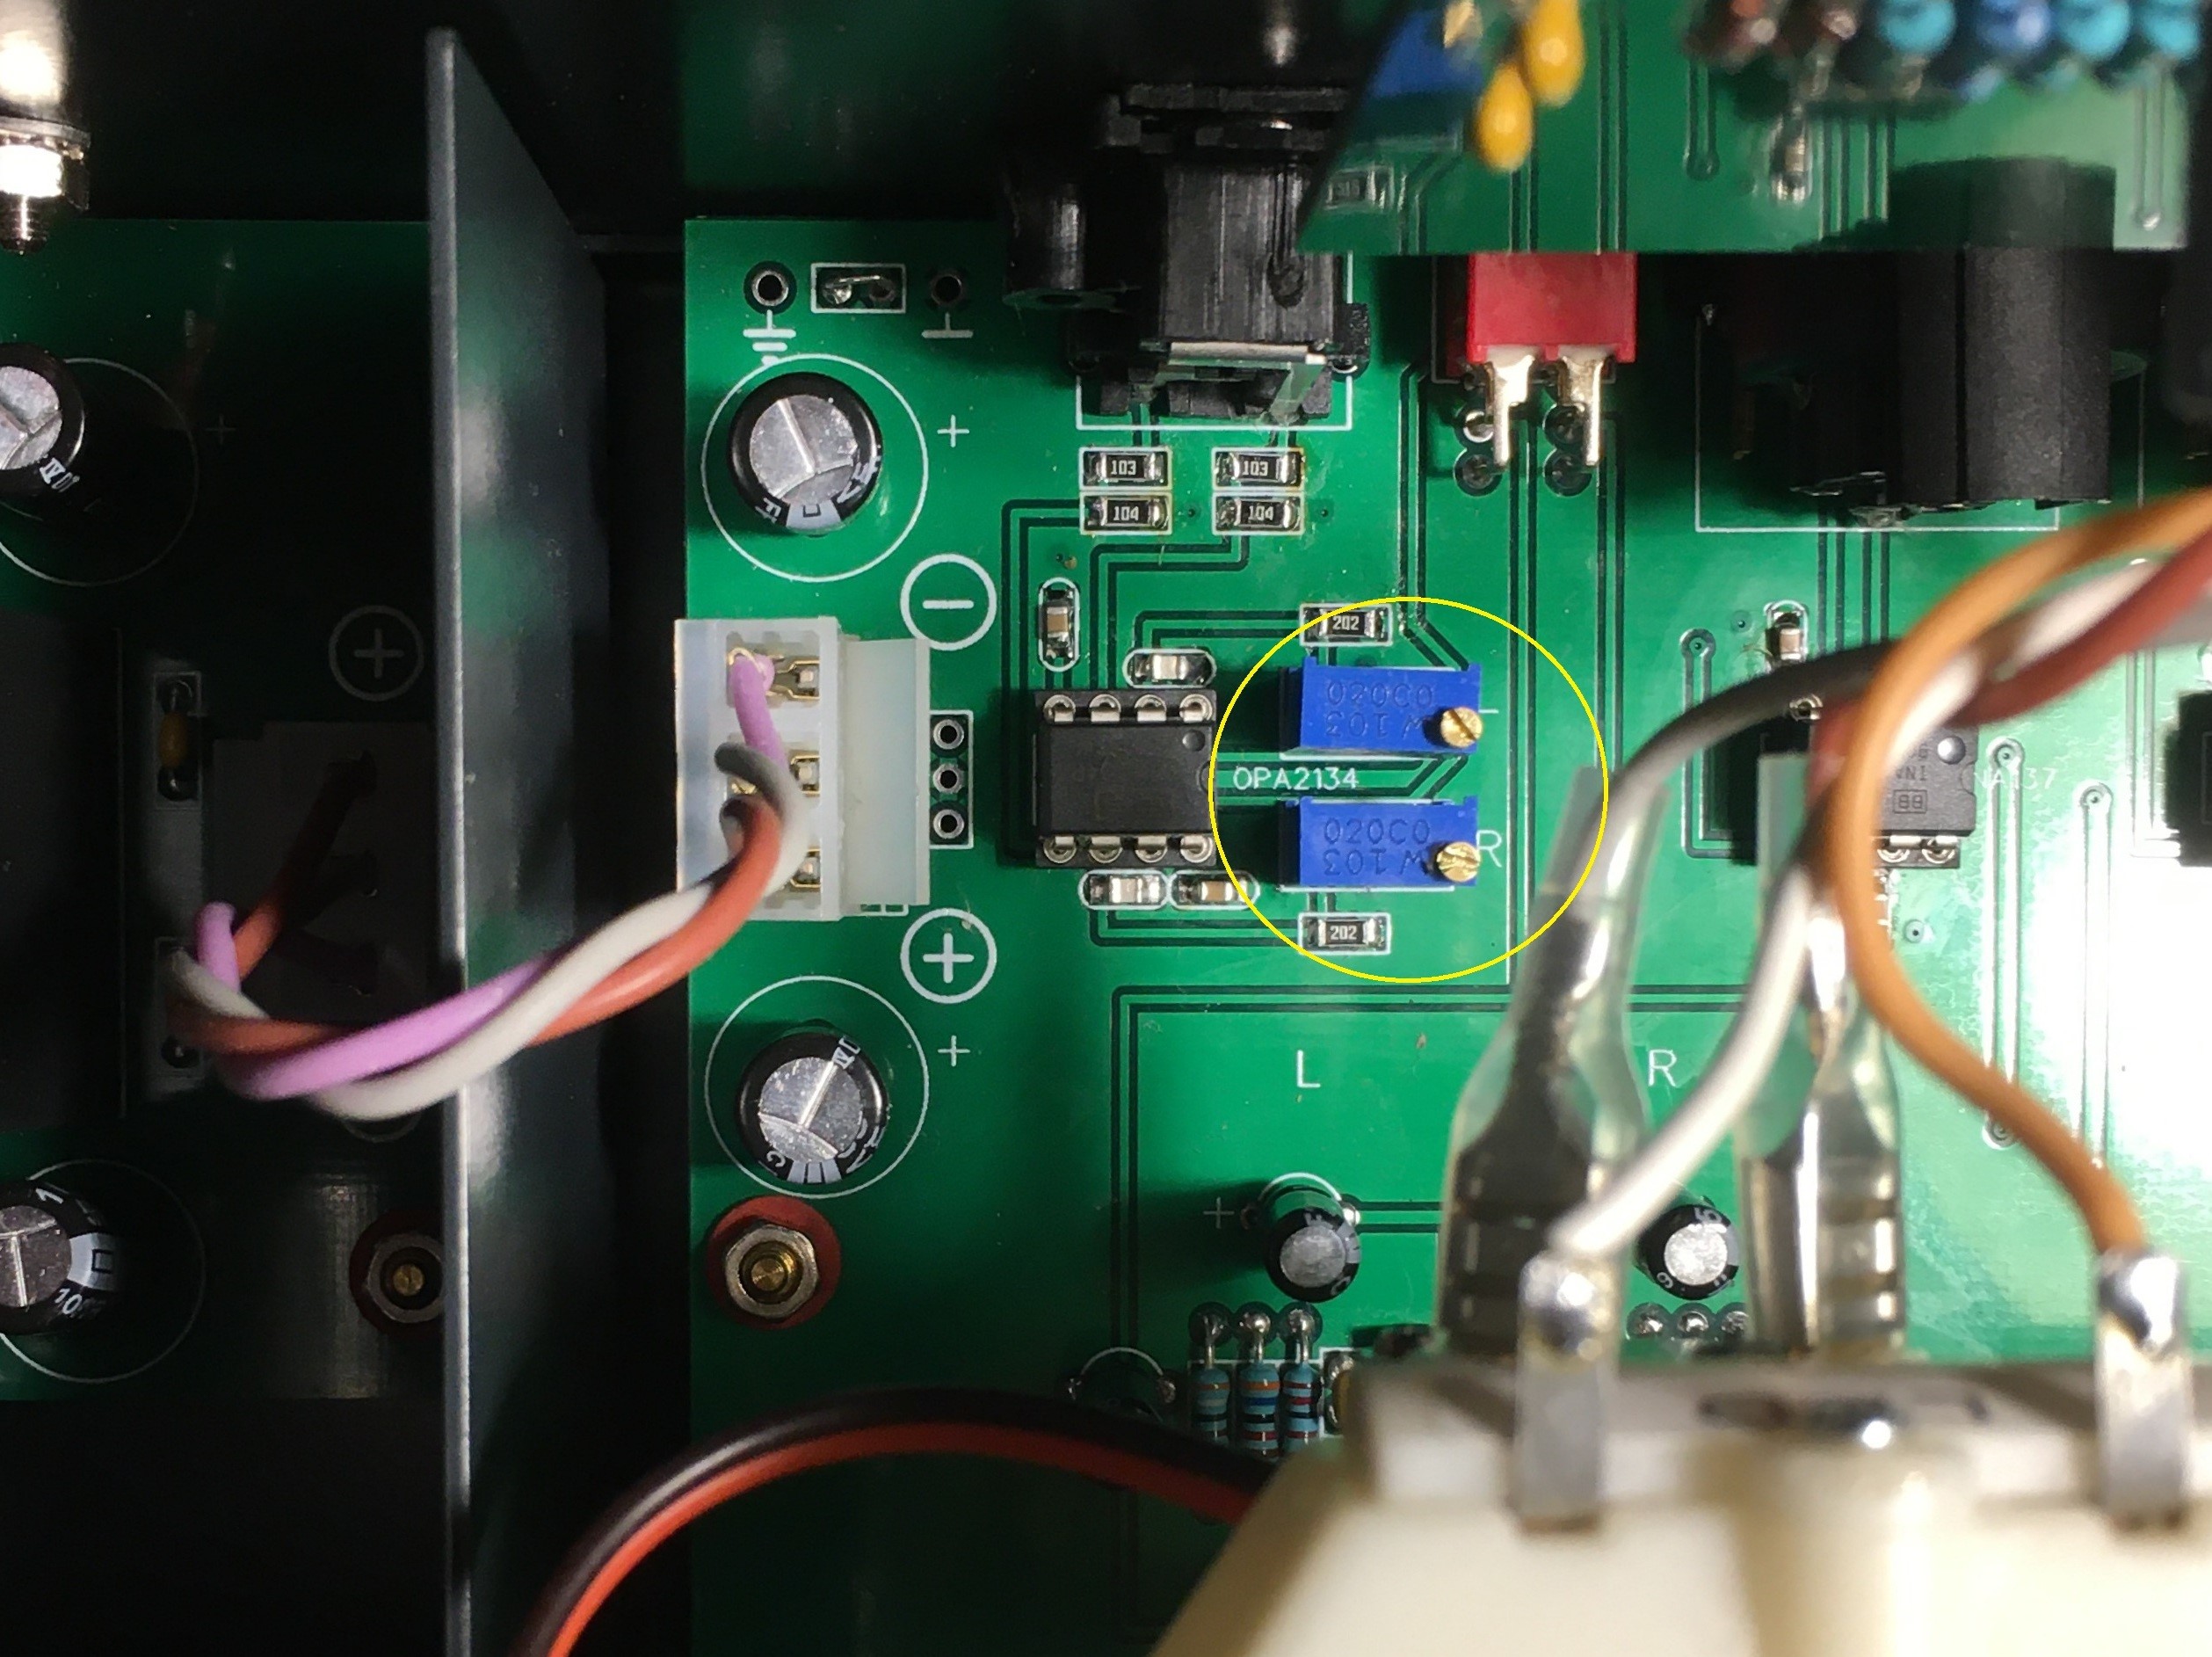
– Remove the cover by unscrewing the six screws (there is a washer under the upper left screw, please do not lose it).
– Set the RCA / XLR switch to RCA.
– Set the Peak / VU switch to VU.
– Deactivate the RECORD LEVEL-UNCAL (Front panel) switch.
– Switch on the INP (Front panel) switch.
– Set switch 0 VU / -10 VU to 0 VU.
– Supply a signal of -10 dBV (0.316 Vrms) to the RCA input INPUT.
– Use the potentiometer inside the unit to set the VU meter reading to 0.
– Carry out the adjustment for channel CH1 (L) and CH2 (R).
Reviews
There are no reviews yet.